Gigasampler Tutorial: Lesson 6
Tascam
Gigastudio home
In this lesson we will give a deeper look to the concept of "dimension".
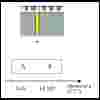
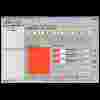
Once we define a region in the region map, we can assign to it different samples and control them with a specific controller. In the example of lesson 1, thanks to the modwheel, we could pass in real time from a clean sound of a guitar, to a distorted one, a palm muted or a power chord. Take for reference figure 1: in correspondence of the note it has been created a region, to which we can assign a sample.
Thanks to "dimension" CC1, we can make the key on our masterkeyboard correspond to different actions. It is important to understand that the two created dimensions (A, B), can be managed in a completely independent way one from the other, and they can be controlled through the action of controller the CC1, that defines the dimension. An "extreme" example could be the assign to sample A a piano and to sample B a string section. Changing the value of the CC1 we will be able to switch between the two sounds, varying ALL the sound parameters (for example the envelopes of attack - decay- release...). Each "case" of a dimension (A, B... we can define up to 32 dimensions, in a very complex way!) it can be managed INDEPENDENTLY from the others. This is the fundamental concept at the base of the dimensions. They will be the skill and the fantasy of the programmer to take advantage in an intelligent and creative way from the possibilities offered.
We will give however different examples on how use of these innovative characteristics for the management of different instruments.
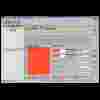
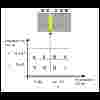
One mathematical observation on the dimensions: Gigasampler can control the dimensions of each region with a "resolution" of maximum 5 bit; for each bit they are created 2 "split", that is two "cases" (A, B of figure 1) to which we can assign different samples, for a total of 2x2x2x2x2=32 split. It is important to emphasise that the management of the splits is INDEPENDENT for each note: in a instrument we will can have notes without split, notes with 32 split, notes with only 2 split and so on. The use of stereo samples consumes a bit, and therefore if you will assign a stereo sample, you will remain with only 4 bit, that is 16 split to assign to others controller. Between the dimensions that can be assigned we have the "velocity split": this also consume the bit at our disposition, therefore a note with assigned sample a stereo and a velocity split will have already used 2 of the 5 bit to disposition (one for stereo and one for the velocity), they will remain therefore 3 to assign to other dimensions, for a total of 8 cases. We will return later on the argument of the velocity split. We make now a small summary of the situation, before complicating things. Up to now we have learned that we can assign to a region (a note) a dimension (attributing it to a controller), creating therefore a split (cases in which we can insert the samples). We have 5 bit at our disposition, and everyone of them corresponds to 2 split: we can so assign up to 5 different dimensions. We see now what it means "to assign more than one dimension" to a region. We will refer to figure 2 and figure 3. By pressing the "edit" key in correspondence of "dimension 1" we go to the dimensions menu. We set a resolution of 1 bit, in order to have 2 splits, and assign this dimension to the CC1 (mod wheel). We repeat the same operations with the key "edit" in correspondence of "dimension 2", this time we assign the dimension to CC16 (general purpose 1). Therefore we have created a note with 2 dimensions. What does this means? Take a look at figure 3, and remember the naval battle game: in correspondence of the note we now have defined 4 split, and these split are organised in a square. The CC1 let us to pass from the split A to split the B (moving on the columns from left to right), while the CC16 let us pass from split H to the split K (moving on the lines from bottom to high). The case that we are going to select will depend on the SIMULTANEOUS value of BOTH controller CC1 and CC16, and they can be controlled INDEPENDENTLY.
The possibilities that we have are:
CC1 from 0 to 63 and CC2 from 0 to 63: we will select case AH
(CC1=0 corresponds to column A, while CC16=0 corresponds to line H)
CC1 from 0 to 63 and CC2 from 64 to 127: we will select case AK (CC1=0 corresponds
to column A, while CC16=127 corresponds to line K)
CC1 from 64 to 127 and CC2 from 0 to 63: we will select case BH (CC1=127 corresponds
to B column, while CC16=0 corresponds to line H)
CC1 from 64 to 127 and CC2 from 64 to 127: we will select case BK (CC1=127
corresponds to column A, while CC16=127 corresponds to line K).
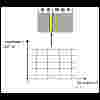
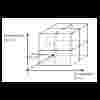
Naturally, if we go to define more split for a dimension (but still remain with a total of 2 dimensions), will in a general build a rectangle with a greater number of lines and/or columns. In the example of figure 4 they have been assigns 8 split to CC1 and 4 split to the CC16, building therefore a rectangle of 32 cases (the maximum possible). The characterised case will depend, as usual, from simultaneous value of CC1 and CC16. Finally, we still remember that each of these cases could be "occupied" with a different sample, with different parameters. We are going to complicate things a bit, adding another dimension, and creating therefore a sample with 3 dimensions. We press therefore the key "edit" in correspondence of "dimension 3", define a resolution of one bit and assign the dimension to CC17 (general purpose 2). The window should be like shown in figure 5. Remembering the diagrams of figure 1 and figure 3, how will now be the situation? The answer is found in figure 6: having defined 3 dimensions, the structure that we have built is now a cube, divided in 8 cases. I have avoided to label the different cases in order to avoid confusion in the drawing, but you should have understood the concept: according to the values you simultaneously will assign to the three controller 1, 16 and 17, you will go to select a single case of the cube and the sample that you will play will be that single one assigned to the case. It will be necessary a little practical in order to succeed to visually manage dimensions higher than 3! Naturally the concepts remain exactly the same also when you will define more than 3 dimensions, but here, unfortunately, nobody will be able to help you with drawings that show to you the structure shape!
|
fig.1
|
fig.2
|
fig.3
|
fig.4
|
fig.5
|
fig.6
|
Lesson Index
Back to lesson 5
Continue to lesson 7
You
don't see frames?
Click here!
